52 Weeks of Historical How-To’s, Week 14: Lighting a Portrait
For this week’s Historical How-To post, we’re turning our eyes (and our lens!) to the 20th century for some inspirational portrait photography! We’re going to take a backward glance at the craft of photography to when it was being popularised in the press and was flourishing in the form of photobooks.
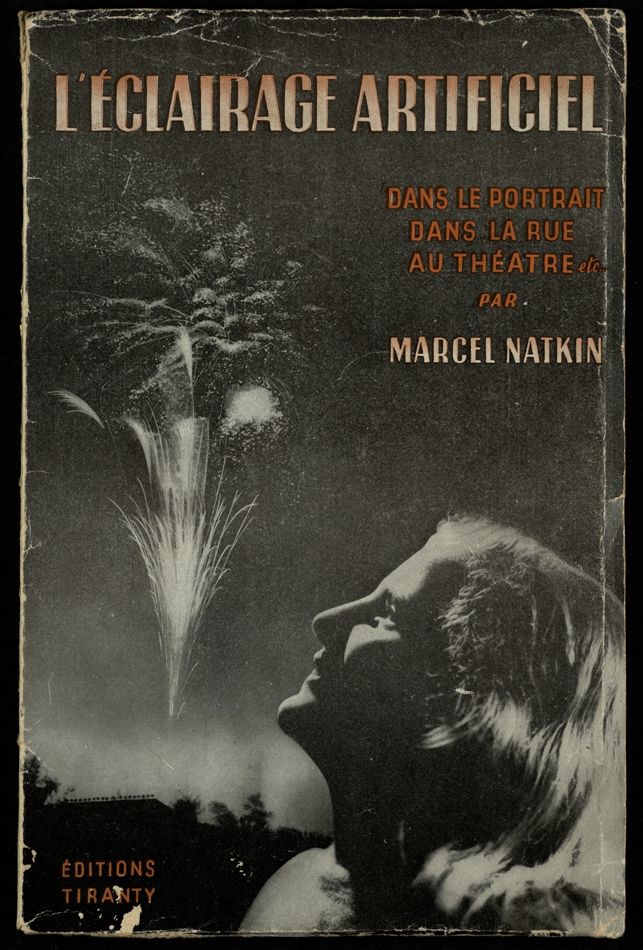
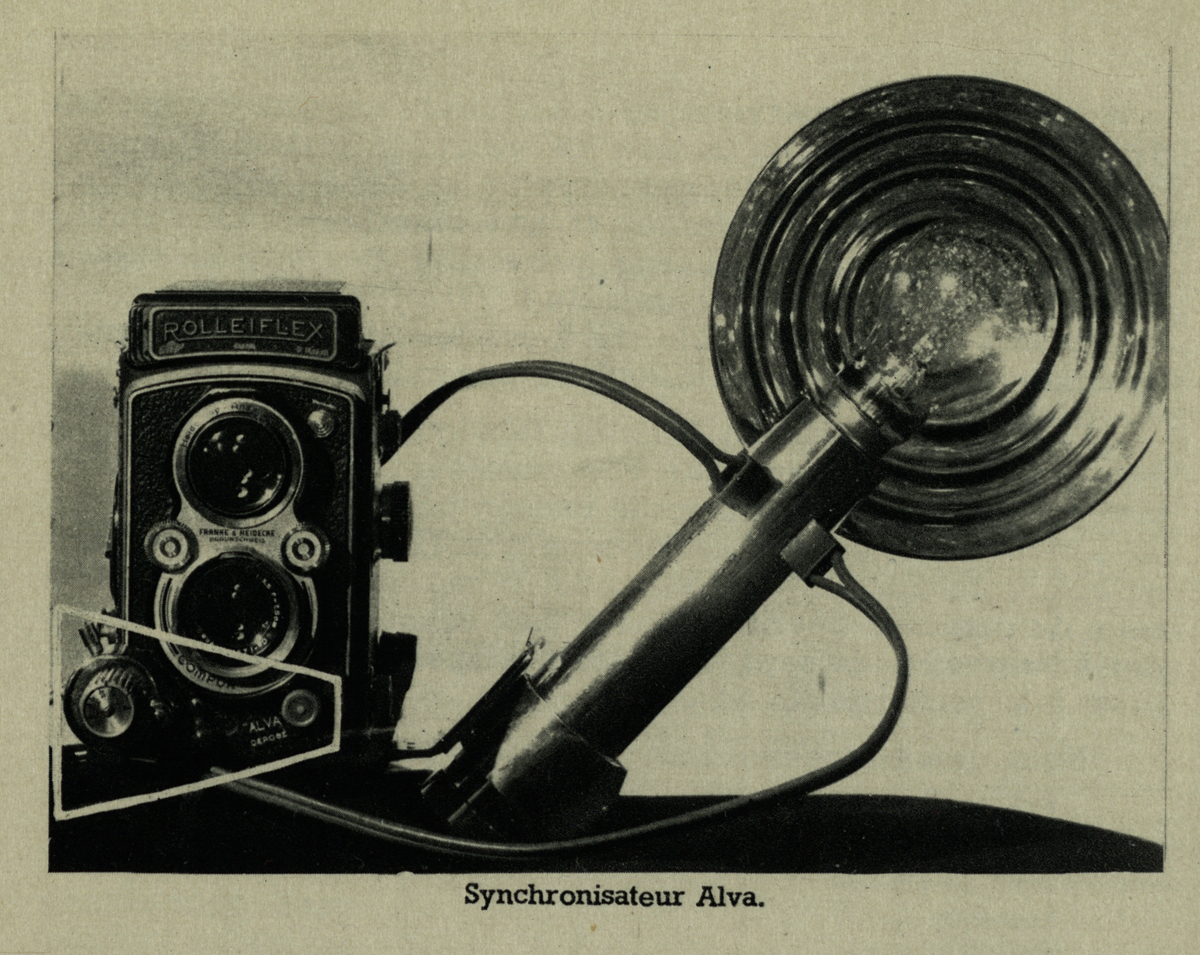
In the past few years, the Special Collections Division has been developing its Photographic Books Collection into a unique resource for historians, art and photographic historians and practising photographers. We’ve been adding to this collection regularly and we were successful in bidding on a number of photobooks in a Parisian auction late last year. Included in these lots of books was a curious little booklet by Marcel Natkin entitled Éclairages artificiels pour le portrait, dans le home, dans la rue, au théatre, etc. (or Artificial lighting for the portrait, in the home, in the street, at the theatre, etc.) which we acquired because it is largely illustrated with photographs by Brassaï.
St Andrews’ copy of this booklet was published in 1947, but Natkin first published this work 10 years earlier under the title Lumière artificielle : guide pratique de la photographie dans les intérieurs, au théâtre, la nuit dans la rue, etc. both in French (published by Tiranty) and in English (Fountain Press). Early attempts to dig up anything about Natkin resulted in very little; he is a bit of a spectre on the internet. However, by searching WorldCat and Copac a picture began to emerge of a fairly prolific author on practical photography who was well connected in the Parisian photographic world. His guides to taking better photographs, using artificial light, nude photography, fakes in photography and new trends in photography are generously illustrated with the likes of Brassaï, Laure Albin Guillot, Pierre Boucher, Man Ray and Roger Schall. Natkin’s name comes up in a list of members of the Vienna Circle of applied philosophers in the 1920s and, thanks to a transcribed article from a 1958 issue of Cinéphotoguide on the Grenier-Natkin firm, we’ve found that he went straight into the photography business. His first book, a guide to the small-format Leica, was published in 1933, but it was his Pour réussir vos photos (For making better pictures), published in 1934 by Tiranty, which would make him a popular name amongst amateur photographers. Pour réussir vos photos was republished in at least 14 editions in French, English and Spanish, and sold over 300,000 copies by the late 1950s. Natkin’s philosophical background is evident in all his texts, but, as the Cinéphotoguide article states:
N’empêche que chez cet homme à facettes multiples, tout commence et tout finit par la photographie (Nevertheless with this multifaceted man everything began and ended with the photograph)
– Cinéphotoguide (1958)
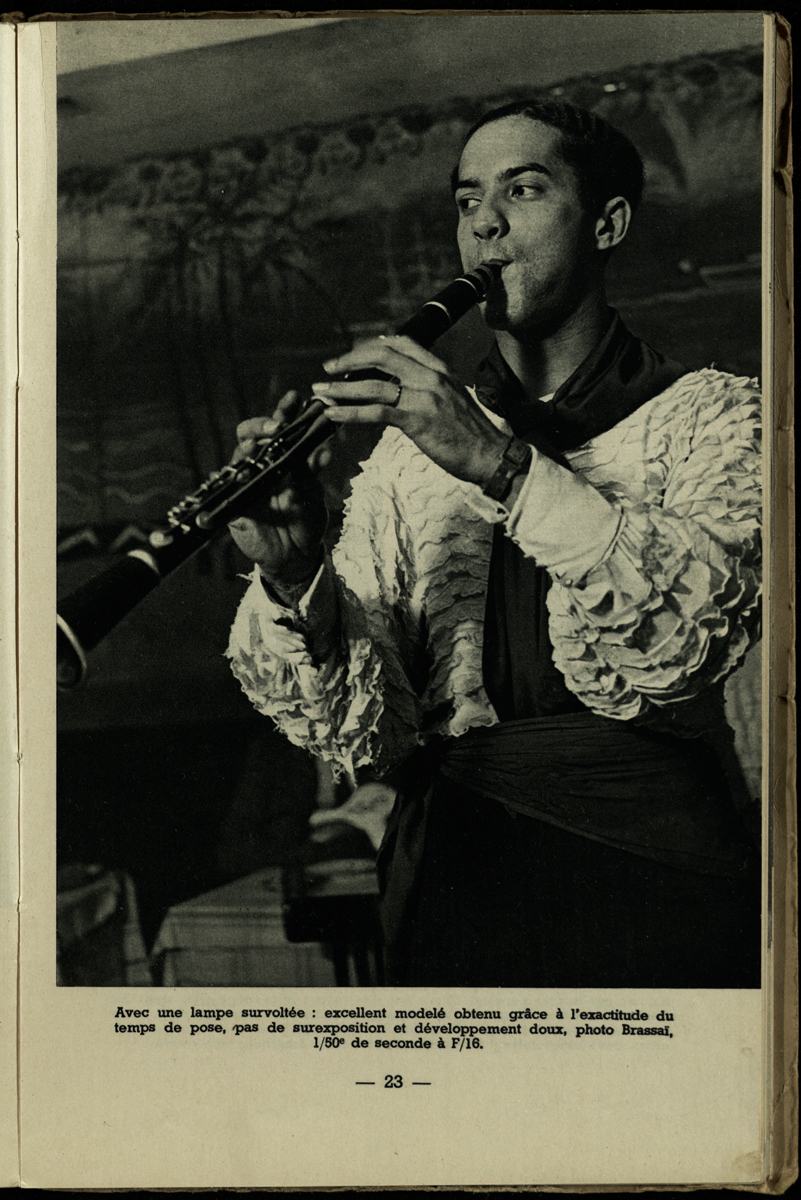
For 95% of users today the act of photographing is not so much a question of technique, exposure, chemistry or lighting, it is one of purchasing a camera with the features you feel are needed (or the salesperson has convinced you of) and that fits your budget. We felt that highlighting these techniques from just after WWII might prove intriguing to an age now bedazzled by cell phone photography, Instagram and digital SLRs — all far removed from the era of wind up shutters, flash bulbs, plate film and toxic photo-chemicals. Photography is still at its essence is not about gear, lenses, shutter speeds, autofocus or the like. Beyond the capture technology, it is about light. Producing a “properly” exposed photograph is nowadays no more complicated than pushing a button. However, there is no better way to utterly destroy the quality of light or mood of a scene than by using a pop up flash on a camera. The reason for this, which will be illustrated in this post, is that direct light whose source is parallel or directly next to the lens is very unflattering. It’s good for recording scientific specimens and maybe for police mug shots, but not so great for your mother or latest beau. The ability to evoke a mood or bring out certain features in a scene or in a person’s face when taking their portrait, continues to require a fine combination of sensitivity to light and how it falls on a subject, and knowing how to recreate what one sees in their mind’s eye in the final digital file or print.
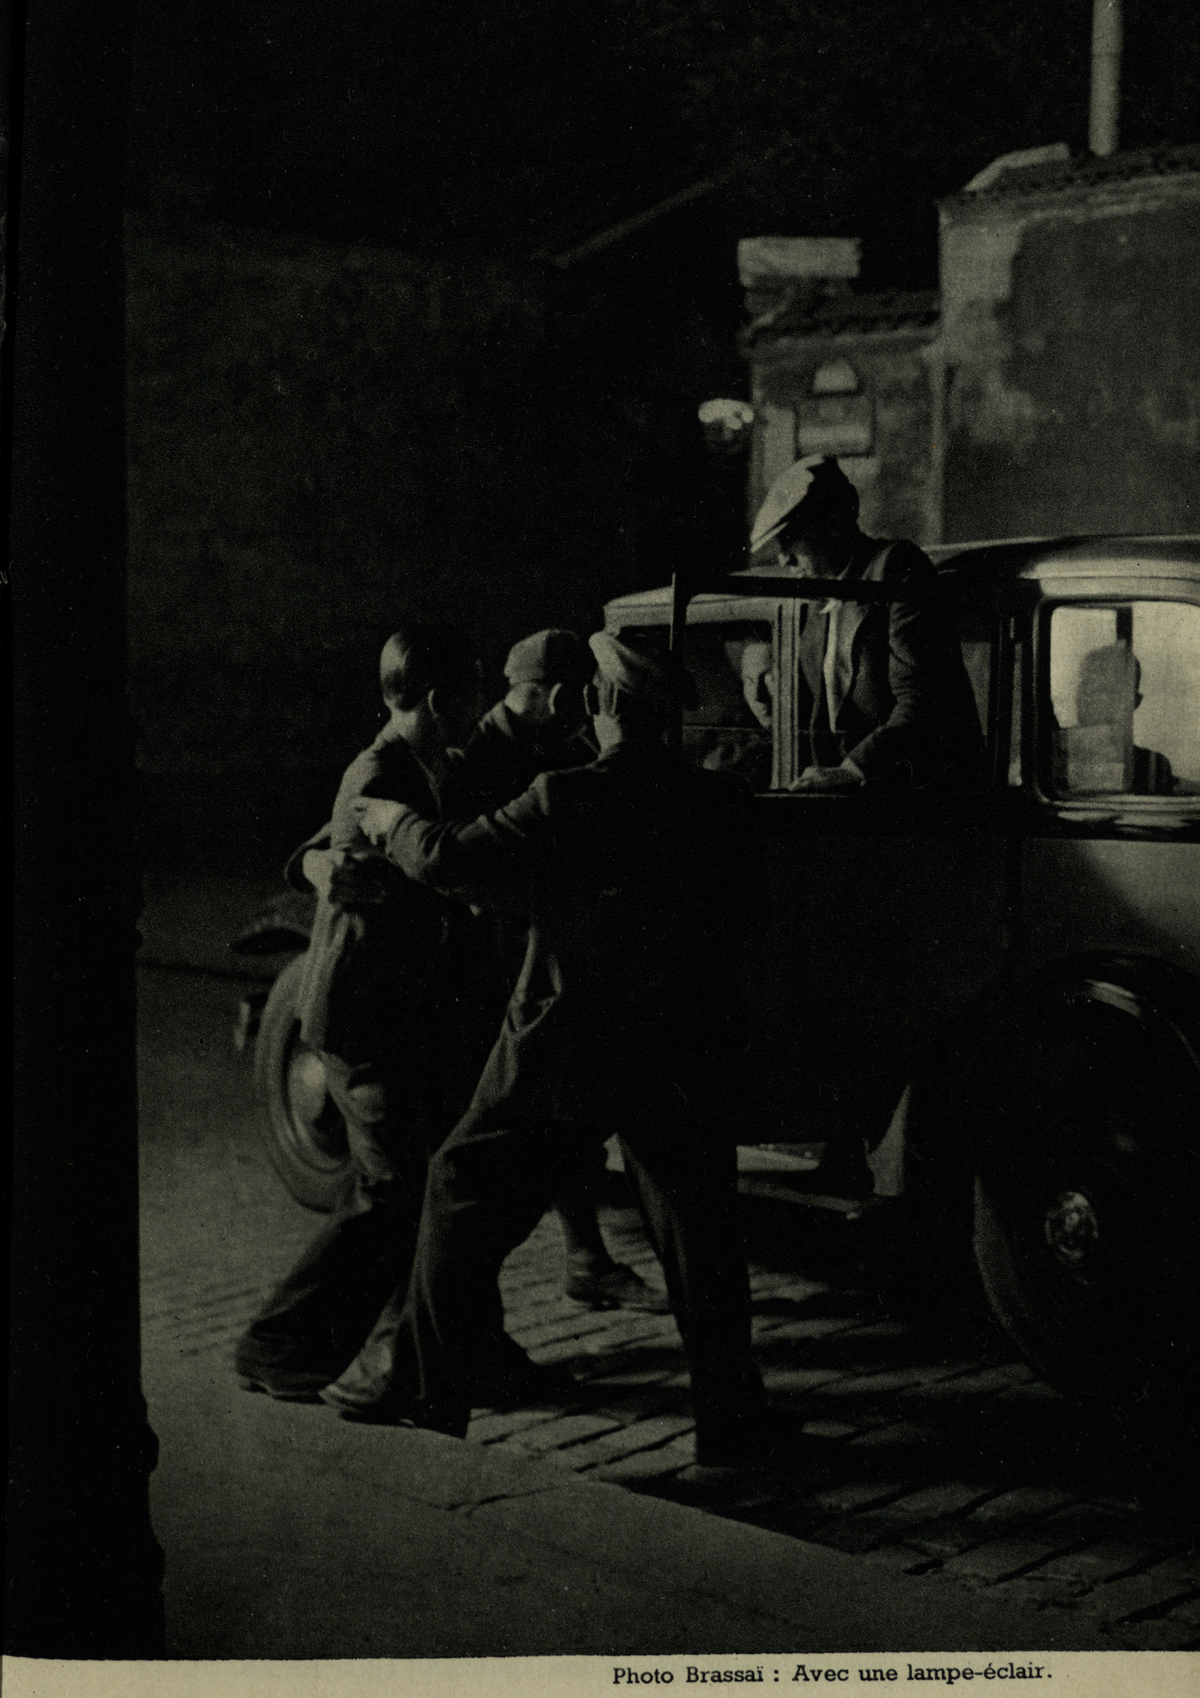
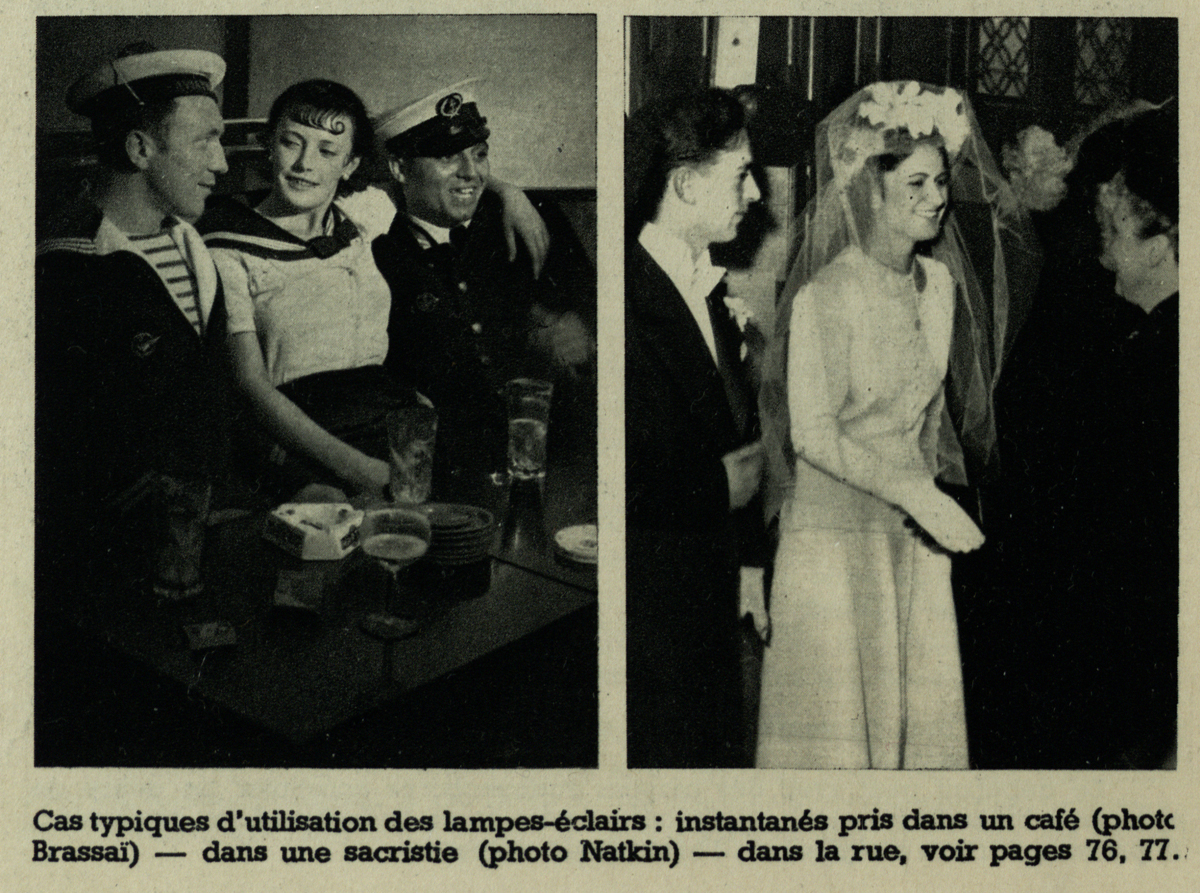
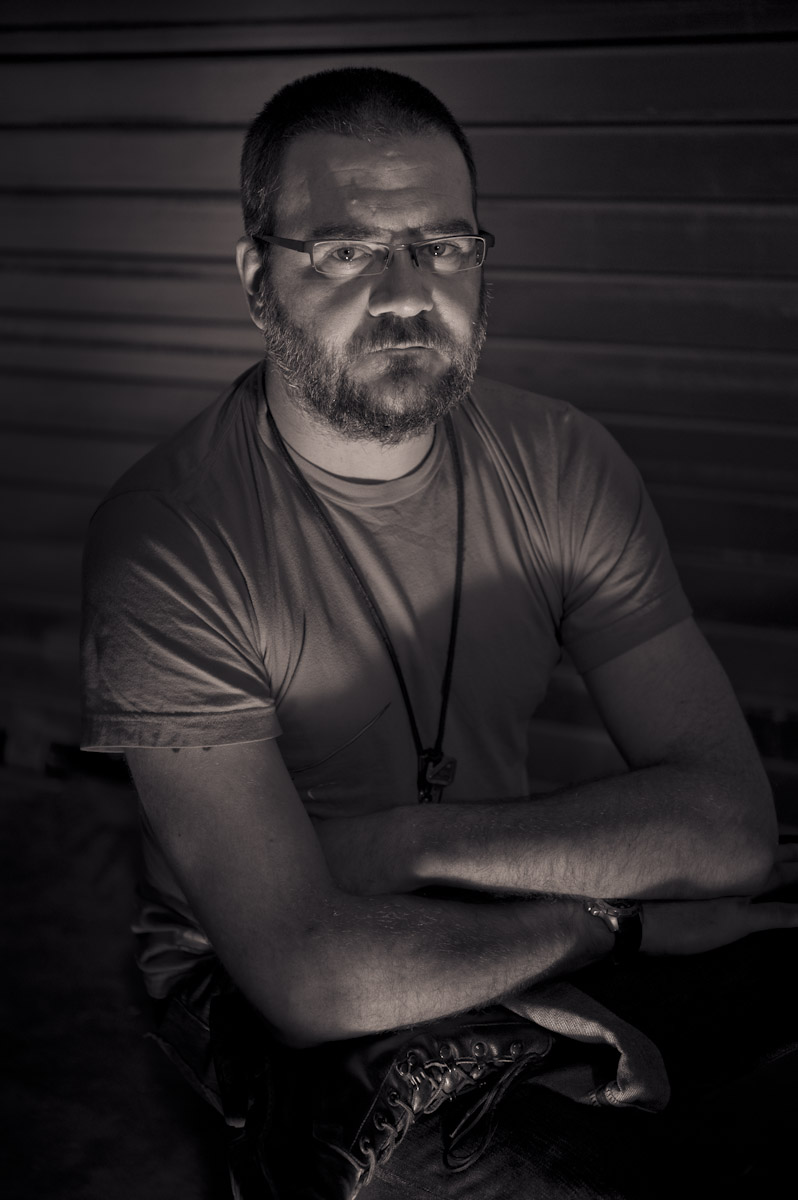
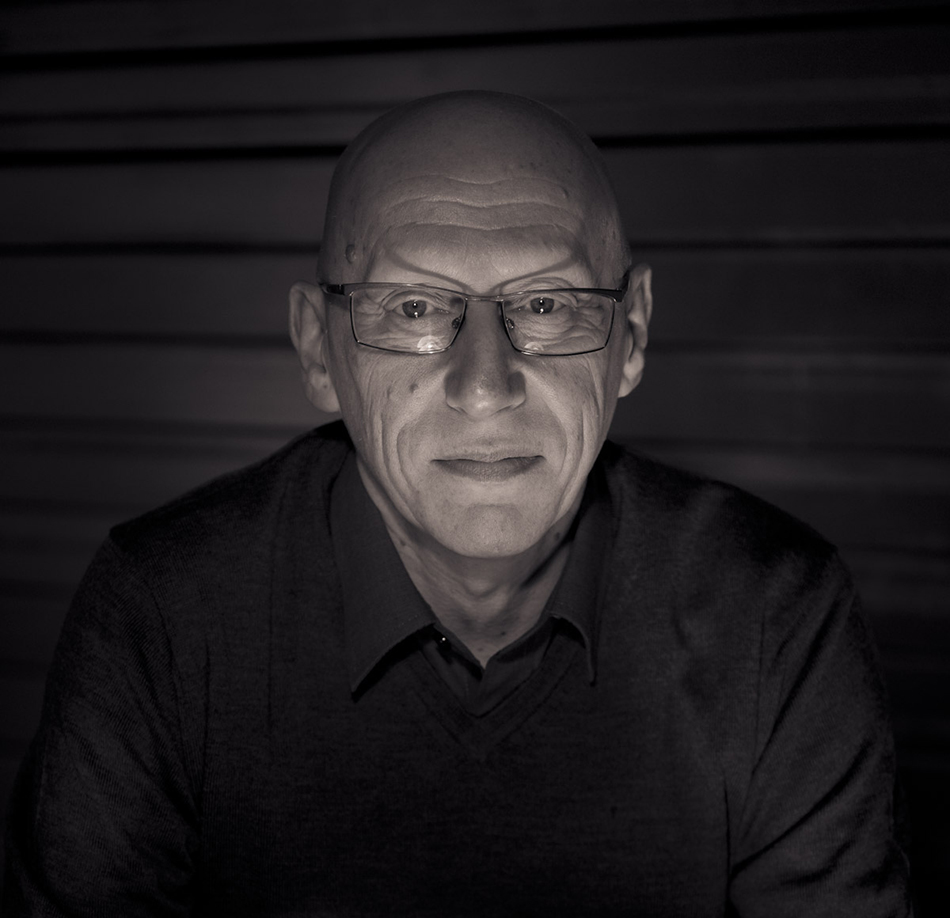
Our copy of Natkin’s Éclairages artificiels is providing us with some guidance on how to light and shoot a portrait for this week’s how-to. His work is adapted and updated from his 1937 Lumière artificielle and includes sections on techniques, lighting levels for portraits and lighting in different environments. Natkin was lucky enough to have Brassaï, a master of flash photography, and several professional models to illustrate his work on practical lighting. We’re making due with our departmental photo-nerds and some members of Special Collections staff to pose for our recreations.
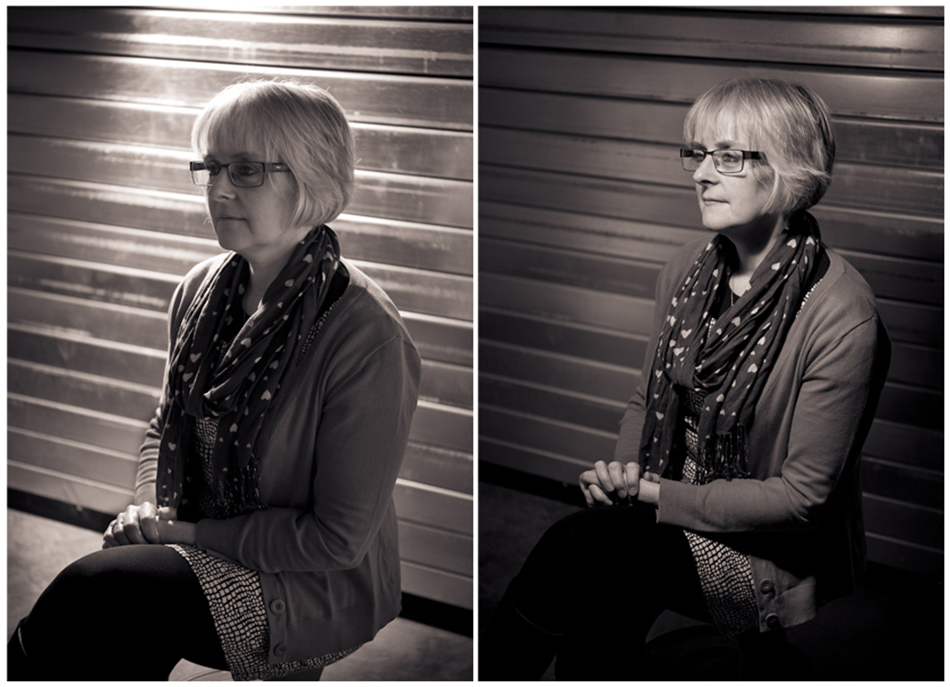
![Recreation of relationship between key light and varying intensity of the fill light. This image illustrates the reduction of shadows as the fill light is brought progressively closer to the subject. Rachel Nordstrom, Photographic Research and Preservation Officer]](http://special-collections.wp.st-andrews.ac.uk/files/2014/01/rachel-n.jpg)
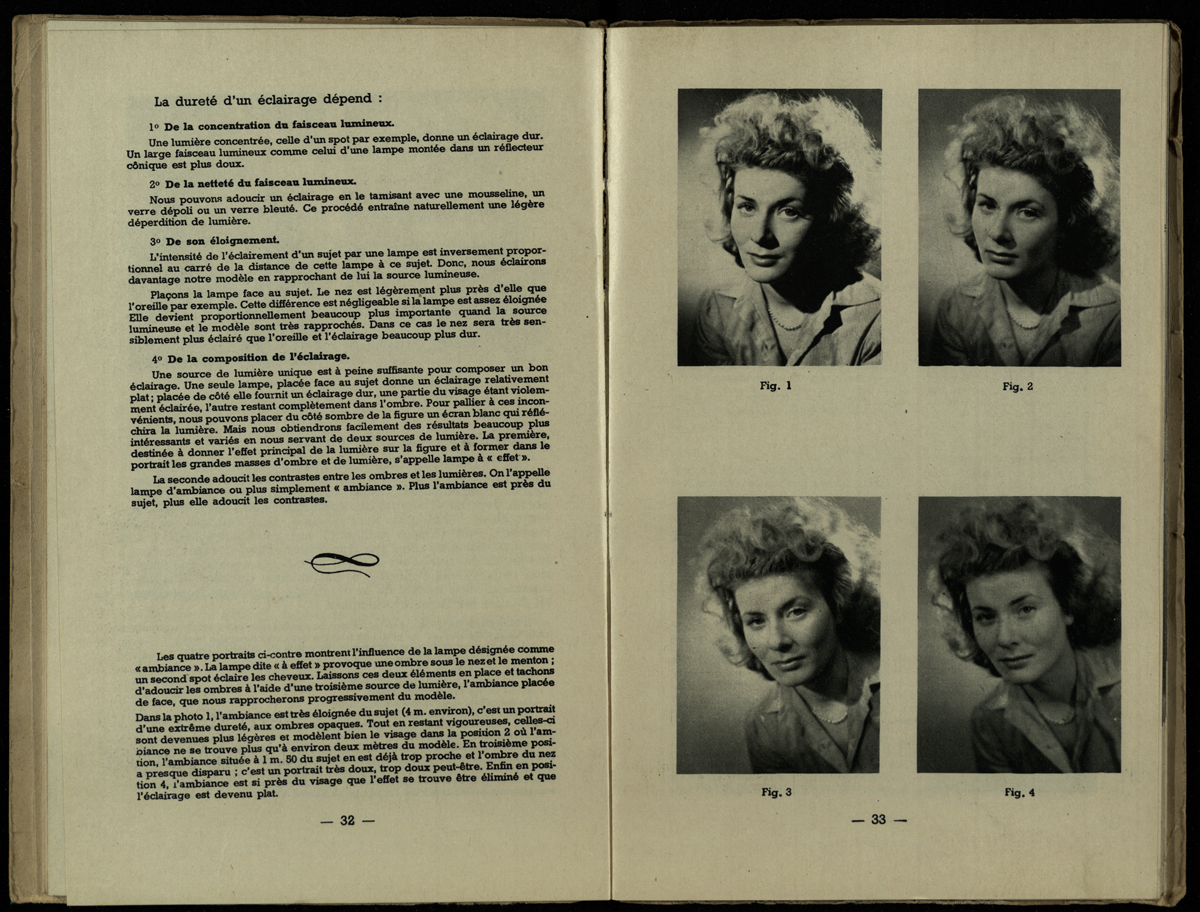
Right from the start of his chapter entitled “Le portrait à la lumière artificielle” Natkin points out that it is light that provides all sense of depth and relief to a portrait, and that its mastery is essential for success. He then quickly proceeds to describe different qualities of light that are obtainable with electric lights. On page 32 four factors are outlined which alter the quality of a light which is shone on a subject:
- The concentration of the light.
- The clarity of the light — Is it a focused harsh beam of light or one that has been diffused by some material such gauze giving soft gradation of tone?
- The distance of the light — The closer a light is to its subject the larger the relative contrast of intensity (brightness) of light between what is closer to the light and what is further away. If a light is very close, to someone’s nose for example, but the ear is further away, than the nose will appear more bright than the ear. This makes for harsh contrast with which can be used to dramatic effect. Conversely, the further the light source is away from a subject, the more even the light is which falls on the subject.
- The lighting setup (or “composition” as the author calls it) — One light source will by itself create very harshly contrasted portraits with dramatic appeal, however as this is not always desirable or attractive, it can be moderated by the use of a reflector to bounce light back into, or “fill”, the shadows on the dark side of the subject facing away from the light. For even more control and creative potential two lights could be used instead of just one; a key light (lampe à effet) and a fill light (lampe d’ambiance). By using a second light to control the shadows very precisely a photographer can add numerous creative variations to the final rendition.
Natkin proceeds to then illustrate this relationship between key light and fill light by showing a first image with only a key light, and then with the next three images bringing the fill (ambiance) light in closer, thus illustrating the impact on the mood and overall effect of the portrait. For the purpose of this post we have attempted to do the same.
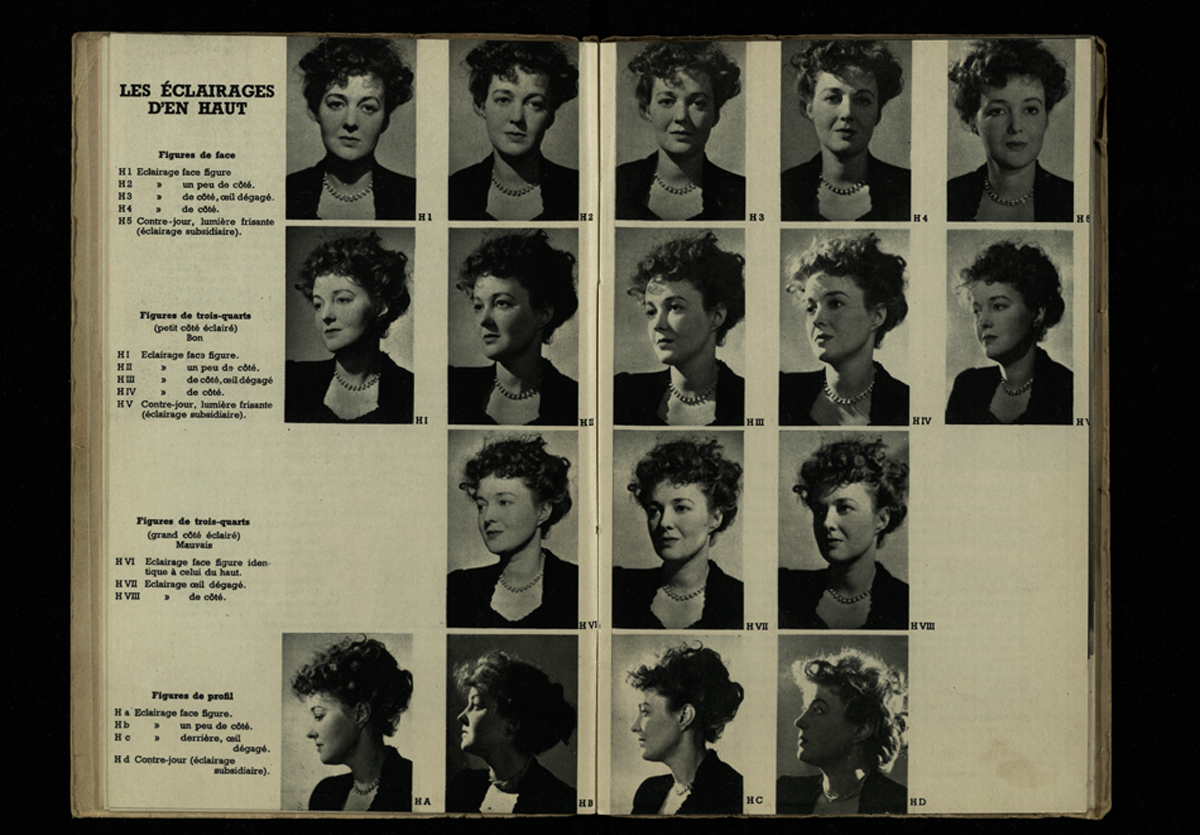

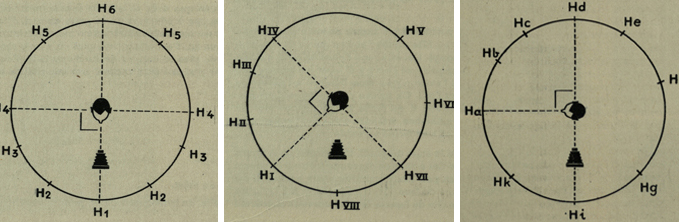
The text moves on to discuss the effect that the position of the key light in relation to the subject has on the rendition of the photograph and provides illustration. This is quickly taken to a higher level by adding a third variable which is the positioning of the subject with respect to the camera; facing forward, at a 45 degree angle away from the camera, or a profile shot at 90 degrees away from the camera. Obviously the permutations of light position to subject position are many as can be seen in the illustrations on pages 38-41.

The three main creative tools then at the portrait photographer’s disposal are the intensity of the key light and the balance it holds with any fill lights, the location of the key light on both the x and y planes, and finally the positioning of the subject to the camera.
Easy peasy!

If you would like to try this at home, it’s as simple as turning off all the lights in a dark room, placing your camera on a tripod or a chair to contend with long exposures, and then using a desk lamp to experiment with the modelling effects of light and shadow on a given subject. Two bits of advice: For starters, we would recommend setting your camera to work in black and white, as this tends to focus the mind on thinking about light in terms of contrast and relief, before delving into the world of colour and its endless nuance. Secondly, resist the temptation to use high ISO settings as this will simply rob you of shadow detail and make your photographs contrasty and marred with digital noise (yuk!).
Have fun!
-DG & MB
P.S. Photographs created for this post were shot on a Nikon D700, with a 60mm F2.8 micro lens, and tungsten lighting.