52 weeks of Historical How-to’s, week 35: knitted cap
This week’s Historical How-To comes from the papers of James David Forbes (1809-1868), who was Principal of the United Colleges of St Andrews University from 1859-1868. This archive focuses mainly on Forbes’ scientific research on electricity, meteorology, physics of heat, and the theory of glaciers, but in amongst the research notes and correspondence is a box of domestic papers probably belonging to Forbes’ mother, aunts and sisters. Mostly dating from the first half of the nineteenth century, these papers contain recipes for foods, medicines, and household chemicals such as starches and polishes, as well as knitting and crochet patterns for children’s bonnets, shawls, purses, etc. Looking through the box, one pattern for a knitted cap caught my attention as being easy to understand, quick to make up, and useful for our cold Scottish winters.
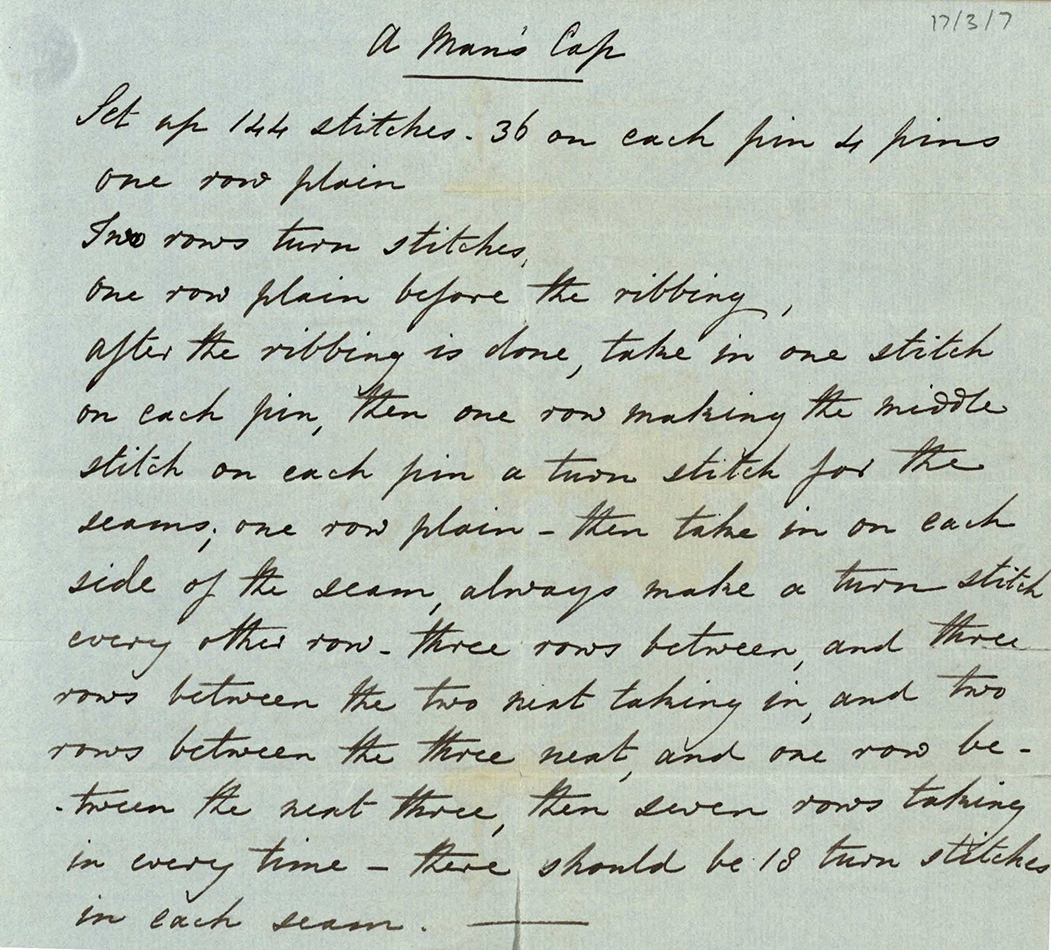
A Man’s Cap
Set up 144 stitches, 36 on each pin 4 pins. One row plain, Two rows turn stitches, One row plain before the ribbing. After the ribbing is done, take in one stitch on each pin, then one row making the middle stitch on each pin a turn stitch for the seams; One row plain – then take in on each side of the seam, always make a turn stitch every other row. Three rows between, and three rows between the two next taking in, and two rows between the three next, and one row between the next three, then seven rows taking in every time – there should be 18 turn stitches in each seam. —
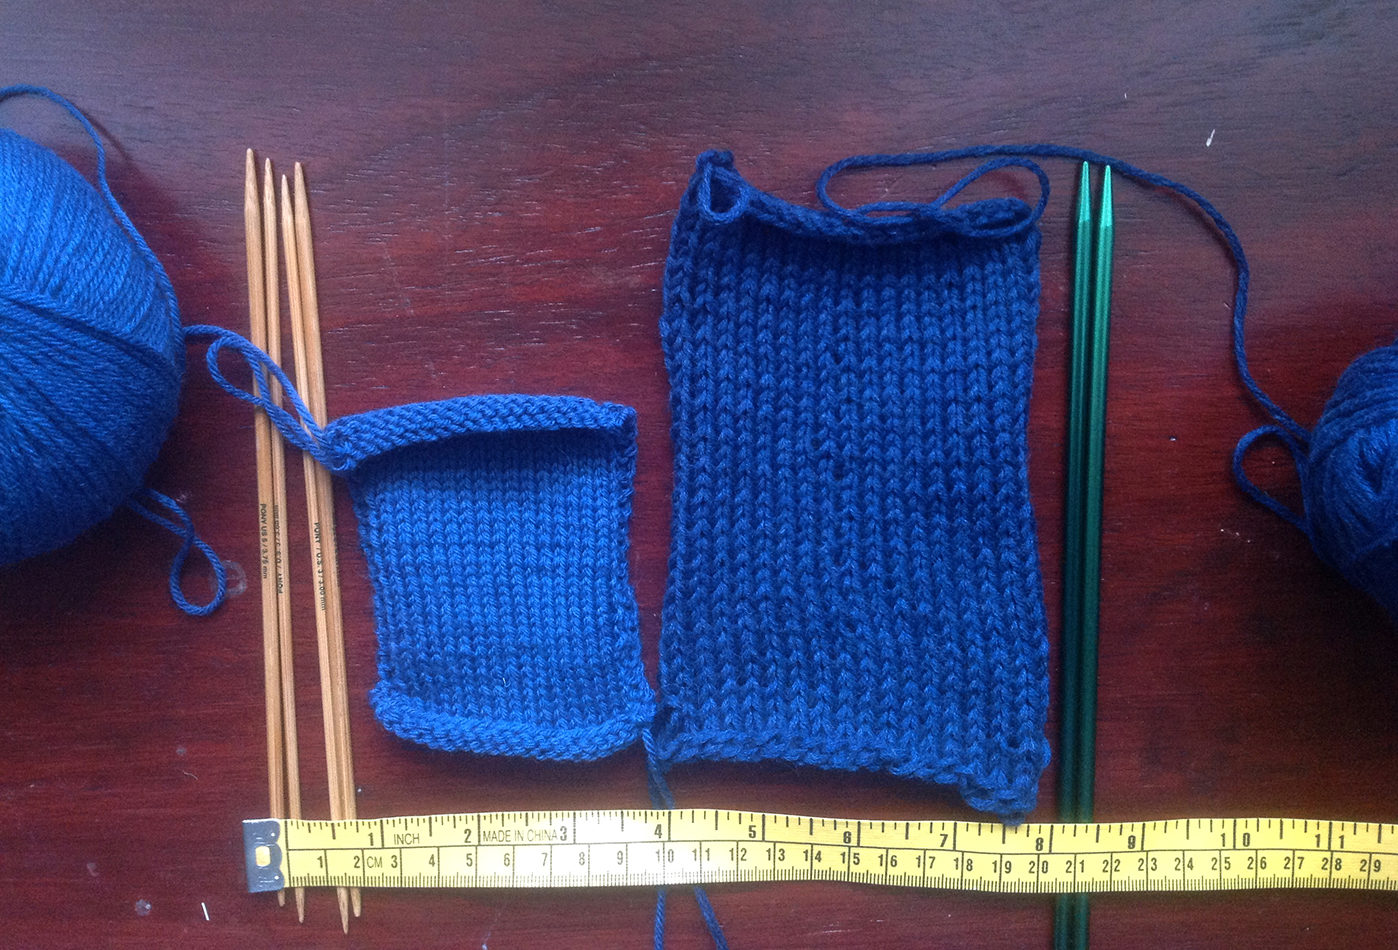
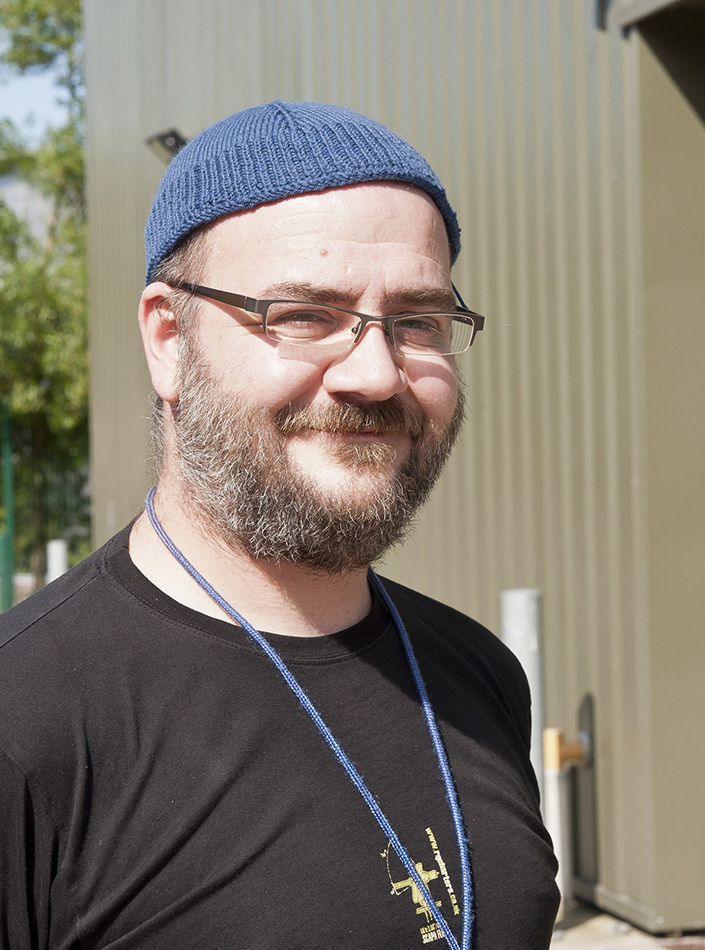
The pattern looks fairly straightforward; there are no seams, no colours, and the only usual term is the “turn stitch”, which I took to mean a stitch made by knitting through the back loop, resulting in a twisted stitch. As with many antique needlework patterns, there is no indication of what type of yarn or what size needles to use, but I knew that the opening of the hat would be 144 stitches around, and I wanted it to fit on a head that’s 23.75 inches around, so I divided 144 stitches by 23.75 to get a gauge of about 6 stitches per inch. Armed with that knowledge, I knitted up some swatches using various combinations of needles and yarn until I produced a swatch of the correct size using a 4-ply/sock weight wool on 3mm (UK size 11/US between size 2 and 3) needles.
Buoyed up by my success with the swatches, I cast on 144 stitches and started knitting. The first four rows were fairly straightforward: 1 row of plain knit, 2 rows knitted through the back loop, and 1 more row of plain. At this point, however, the pattern required a leap of faith. The directions jump from, “before the ribbing,” to “after the ribbing is done,” so obviously there’s supposed to be some amount of ribbing in the middle, but it’s assumed that the knitter knows how long the ribbing is supposed to be. I thought this must be a question of whether you want a hat with a narrow brim (like a beanie) with just a few rows of ribbing, or a wide one that folds up (like a watch cap), with a few inches of ribbing. I decided that I wanted a hat with a little bit of a fold at the brim, so I knitted 16 rounds, or about 1.75” of ribbing, and then moved on to the pattern for the crown.

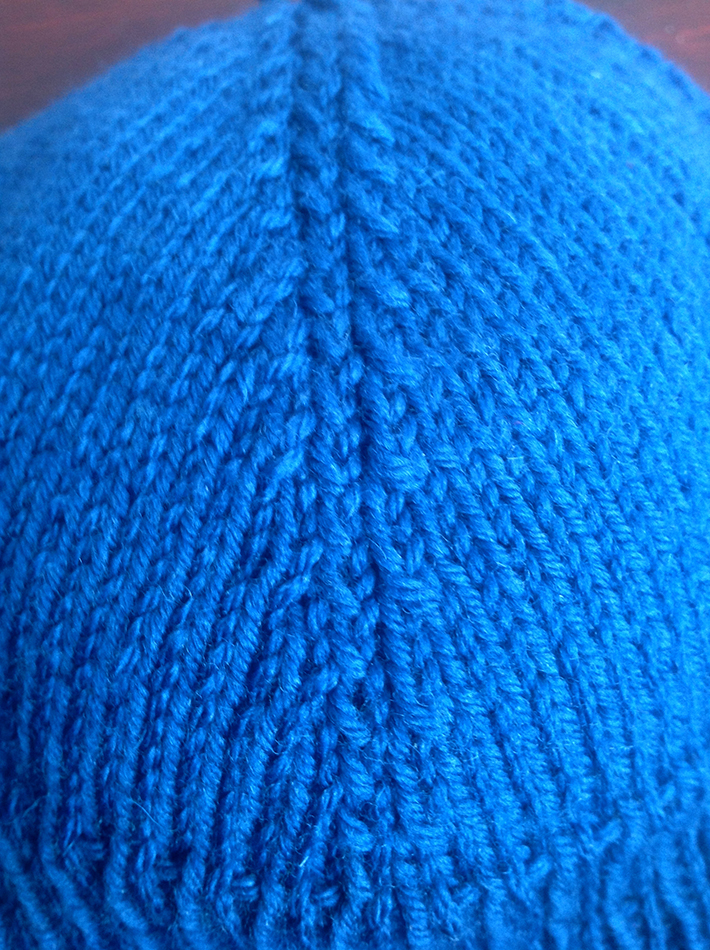
On the crown, the pattern calls for a single twisted stitch on every other round to mark the centre of each needle. Not only does this create a subtle decorative effect, it also tells the knitter where to make the decreases without having to use stitch markers or count stitches to find the middle on each decrease row.
For the first several rounds, everything seemed to be going smoothly. After the first two or three decreases though, I began to worry. The crown of the hat seemed to be tapering off too quickly. At this rate, the crown would be too shallow, more like a kippah than a watch cap. Sill, by this time I had already spent several hours knitting and was reluctant to turn back. Despite my concerns, I decided to see the pattern through to the end. At the very least, if I knew exactly what the hat looked like when made up according to the pattern, I would know how to adjust it for a second attempt. Sure enough, the resulting hat was just about the right size for a baby’s bonnet.
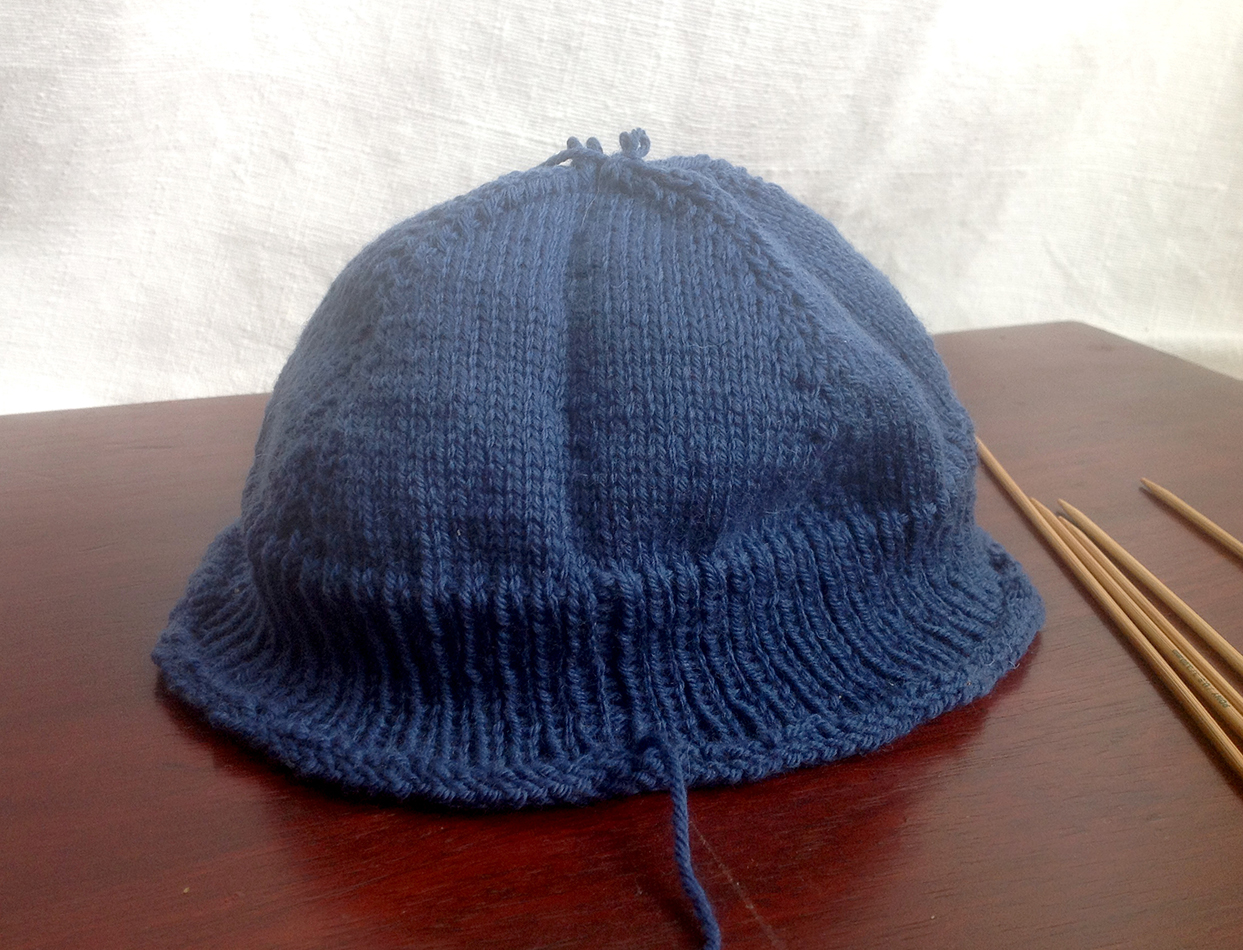
Apart from the all-important detail about the length of the ribbing, however, the pattern was quite easy to follow and resulted in a nicely shaped crown. The ribbing, if made long enough to cover an adult-sized head, would be very thick and warm. I think this pattern would be well worth making up again, this time with 6-8” of ribbing. My truncated version only used up about half of a 50g skein of yarn, so a full-sized hat could probably be made from one full skein, making it an inexpensive project too.
Written out line by line for modern knitters, the pattern would look like this:
k = knit
k tbl = knit through the back loop
skp = slip 1, knit 1, pass the slipped stitch over (a left-slanting decrease)
k2tog = knit 2 together (a right-slanting decrease)
sk2p = slip 1, knit 2 together, pass the slipped stitch over (a double decrease)
On double-pointed needles, cast on 144 stitches (36 on each needle).
Round 1: knit
Rounds 2-3: knit tbl
Round 4: knit
From there, make your ribbing (k1, p1, or any other pattern you like), continuing until it is approximately 5-6” long for a cap without a fold or 7-8” long for a cap with a folded brim. Once your ribbing has reached the desired length, make the crown as follows:
On each needle:
Round 1: k (36 stiches)
Round 2: k17, k2tog, k17 (35 stitches)
Round 3: k17, k1 tbl, k17
Round 4: knit
Round 5: k15, skp, k1 tbl, k2tog, k15 (33 stitches)
Round 6: knit
Round 7: k16, k1 tbl, k16
Round 8: knit
Round 9: k14, skp, k1 tbl, k2tog, k14 (31 stitches)
Round 10: knit
Round 11: k15, k1 tbl, k15
Round 12: knit
Round 13: k13, skp, k1 tbl, k2tog, k13 (29 stitches)
Round 14: knit
Round 15: k14, k1 tbl, k14
Round 16: knit
Round 17: k12, skp, k1 tbl, k2tog, k12 (27 stitches)
Round 18 knit
Round 19: k13, k1 tbl, k13
Round 20: k11, skp, k1, k2tog, k11 (25 stitches)
Round 21: k12, k1 tbl, k12
Round 22: knit
Round 23: k10, skp, k1 tbl, k2tog, k10 (23 stitches)
Round 24: knit
Round 25: k11, k1 tbl, k11
Round 26: k9, skp, k1, k2tog, k9 (21 stitches)
Round 27: k10, k1 tbl, k10
Round 28: k8, skp, k1, k2tog, k8 (19 stitches)
Round 29: k9, k1 tbl, k9
Round 30: k7, skp, k1, k2tog, k7 (17 stitches)
Round 31: k8, k1 tbl, k8
Round 32: k6, skp, k1, k2tog, k6 (15 stitches)
Round 33: k5, skp, k1 tbl, k2tog, k5 (13 stitches)
Round 34: k4, skp, k1, k2tog, k4 (11 stitches)
Round 35: k3, skp, k1 tbl, k2tog, k3 (9 stitches)
Round 36: k2, skp, k1, k2tog, k2 (7 stitches)
Round 37: k1, skp, k1 tbl, k2tog, k1 (5 stitches)
Round 38: skp, k1, k2tog (3 stitches)
In other words, to make the crown, you work two decreases, one on either side of the centre stitch on each needle, on rounds 5, 9, 13, 17, 20, 23, 26, 28, 30, and 32-38. At the same time, on every odd-numbered round from 3 onwards, you twist the centre stitch on each needle by knitting through the back loop.
Finishing instructions are not part of the original pattern, but I’ve adapted these from similar hat patterns: After round 38 of the crown, you should have just 3 stitches on each needle, or 12 total. Knit one more round, making a sk2p double decrease on each needle, leaving you with just one stitch from each needle or 4 total. Cut your yarn, leaving a tail of 8-12 inches. Using a tapestry needle or crochet hook, thread the yarn through the remaining four stitches. Thread it through the four stitches a second time, pull it tight, and then weave in the ends on the inside of the hat.
-CM
I love this blog so much and have tweeted and shared it. Thank you.
thanks, Carricklass! Gald you liked it!
[…] was 52 Weeks of Historical How-To’s: a year of exploring our collections, following recipes and knitting patterns, recreating photographic processes, crafting and brewing and climbing mountains, taking […]