52 Weeks of Historical How-To’s, Week 47: To Make Yeast
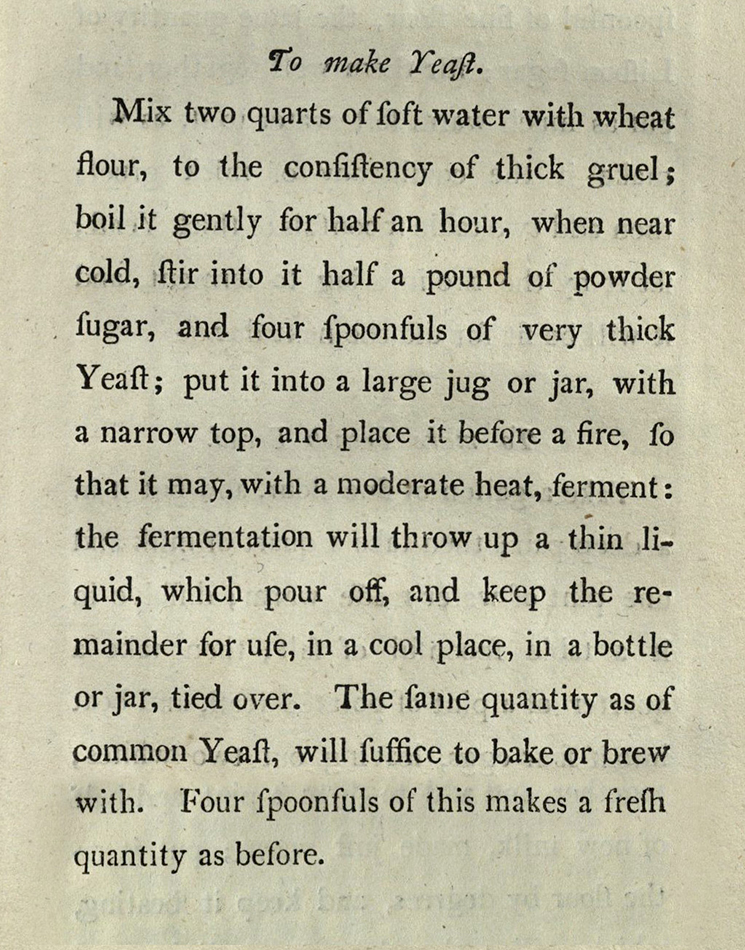
 For this week’s Historical How-To, I intended to look for a jam or jelly recipe to preserve the bumper crop of blackberries in the hedgerow near my home, but turned up only a rather uninspiring recipe in The family director: or, housekeeper’s assistant : containing upwards of three hundred original receipts, in pastry, pickling, preserving, collaring, making wines, &c. by Addison Ashburn (Coventry, 1807). In that same volume though, a recipe “to make yeast” caught my eye:
Although the dried yeast granules found in supermarkets today contain the same species of yeast (Saccharomyces Cerevisiae) that has been used for brewing and baking for centuries, dried yeast has only been available since World War. Instead, the yeast that The Family Director describes is more like a sourdough starter, in which a live culture is maintained by periodically feeding it fresh flour and water, and retaining a small portion after each use to inoculate the next batch.
In particular, I was intrigued by the sentence, “The same quantity as of common Yeast, will suffice to bake or brew with.” While I am no stranger to sourdough thanks to a “friendship cake” starter that made its way around the department in 2012-2013, I had never tried using the same starter for both brewing and baking. I decided that I would use yeast prepared according to these instructions to make some 19th century household staples: bread and beer. Since we’ve already had a how-to about beer though, I’ll be making ginger beer instead. Armed with a few spoonfuls of starter from a colleague to inoculate my sourdough, I was ready to begin.
This yeast recipe has one major difference from other sourdough starters I’d encountered in the past: the flour and water are boiled together before adding the yeast. There was no reason given for this extra step, although I have some theories. Bread baking traditions in Scandinavia and elsewhere call for a portion of the flour to be scalded (i.e. boiling water poured over it) before being mixed into the dough. The boiling water bursts the starch granules in the flour, making the dough sweeter and releasing more sugars for the yeast to ferment. The long boiling time may also have the added effect of pasteurizing the mixture and killing any bugs living in it.
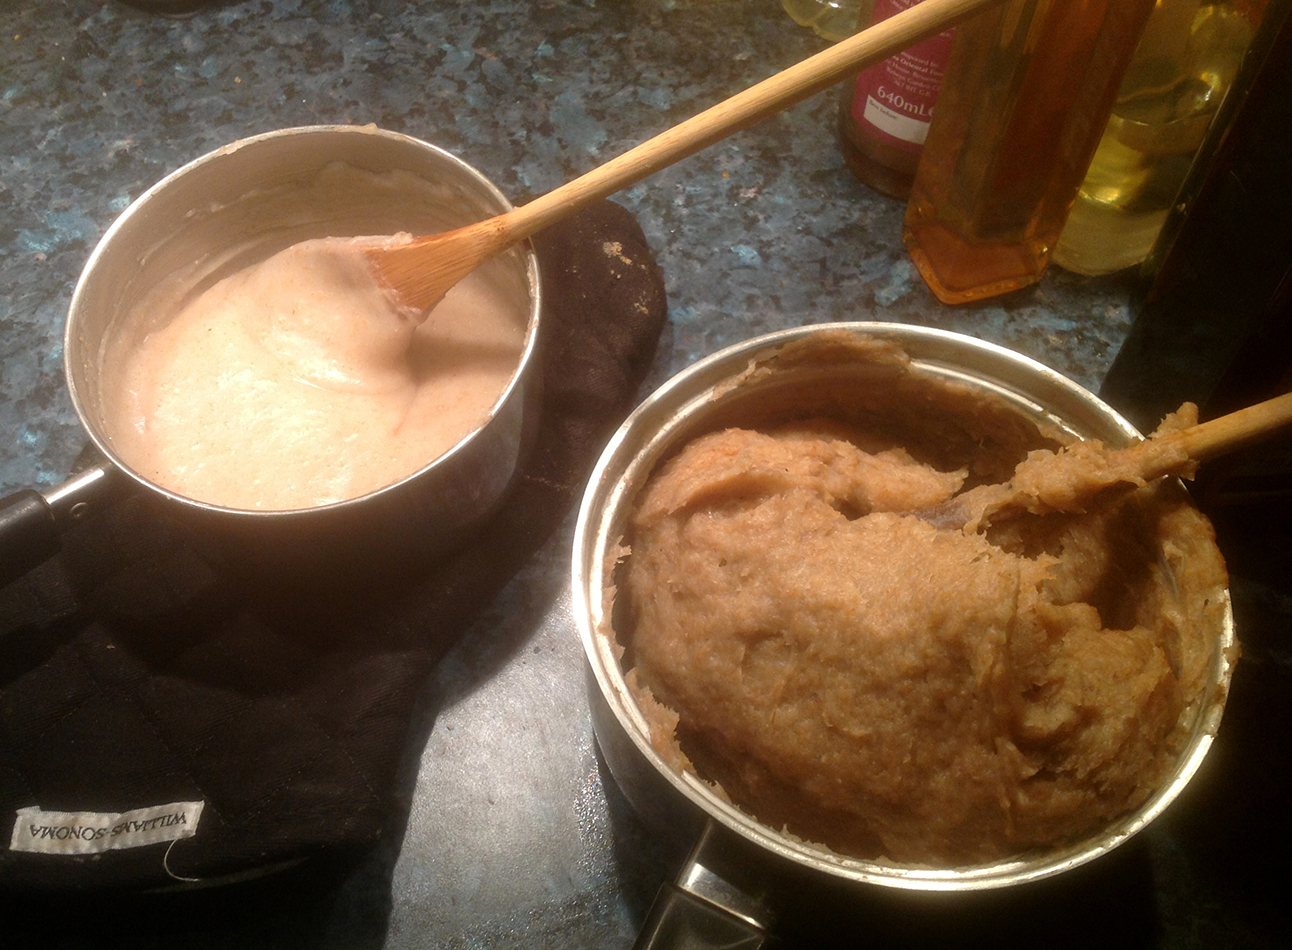
The (uncooked) starter that I had been given was made with equal amounts of flour and water by weight, so I mixed up some starter with the same proportions. Given that I planned to make just one loaf of bread and one gallon of ginger beer, I reduced the recipe to about one tenth of the original volume, or one cup of water to 200g or about 1.5 cups of flour. The resulting mixture looked to me like thin, runny porridge, which I thought probably resembled “thick gruel”, but within five minutes of setting it on the stove to “boil it gently,” the whole thing turned into a solid lump of gluten. Apparently, “thick gruel” is a great deal thinner than I thought.
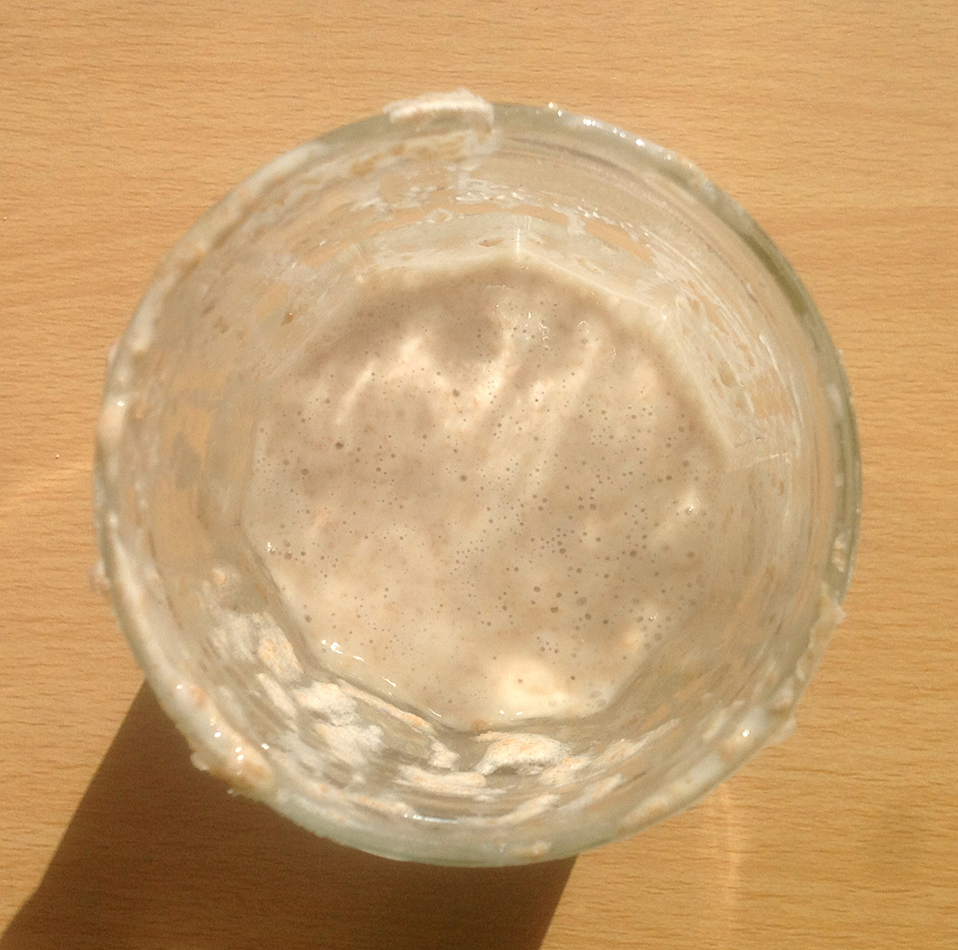
Undeterred, I made a second batch with half the amount of flour for the same quantity of water. After boiling, this resulted in a thick, viscous goo that needed constant stirring to keep from burning, but would still flow, rather than roll, downhill. I let it cool, added sugar and a spoonful of my starter, covered it loosely, and set it by the radiator to ferment.
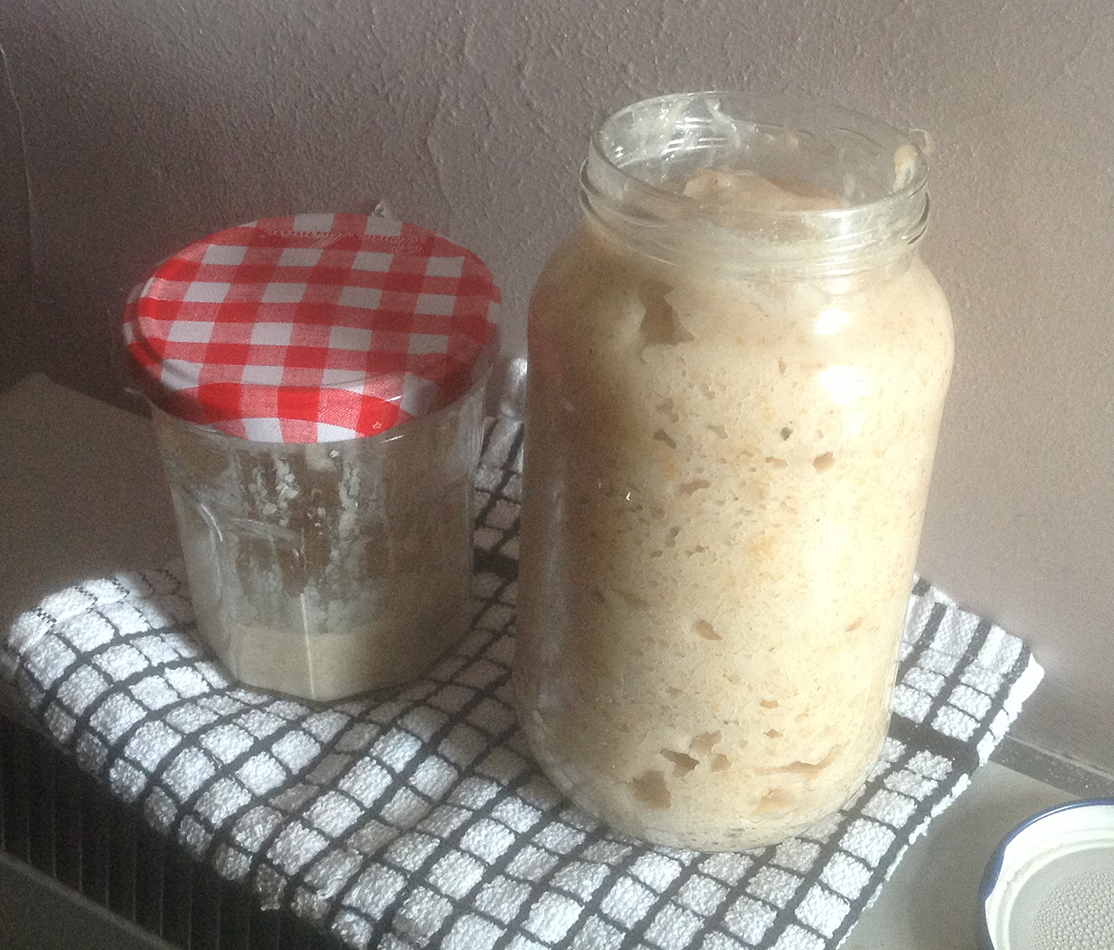
The next morning, my jar of yeast was bubbly, but there was no thin liquid as promised in the recipe so I left it to ferment a while longer. After 3 days had passed, the consistency had not changed noticeably, but it was still bubbling and had a sourdough smell, so I was reasonably confident that the yeast was alive and well and ready to go to work.
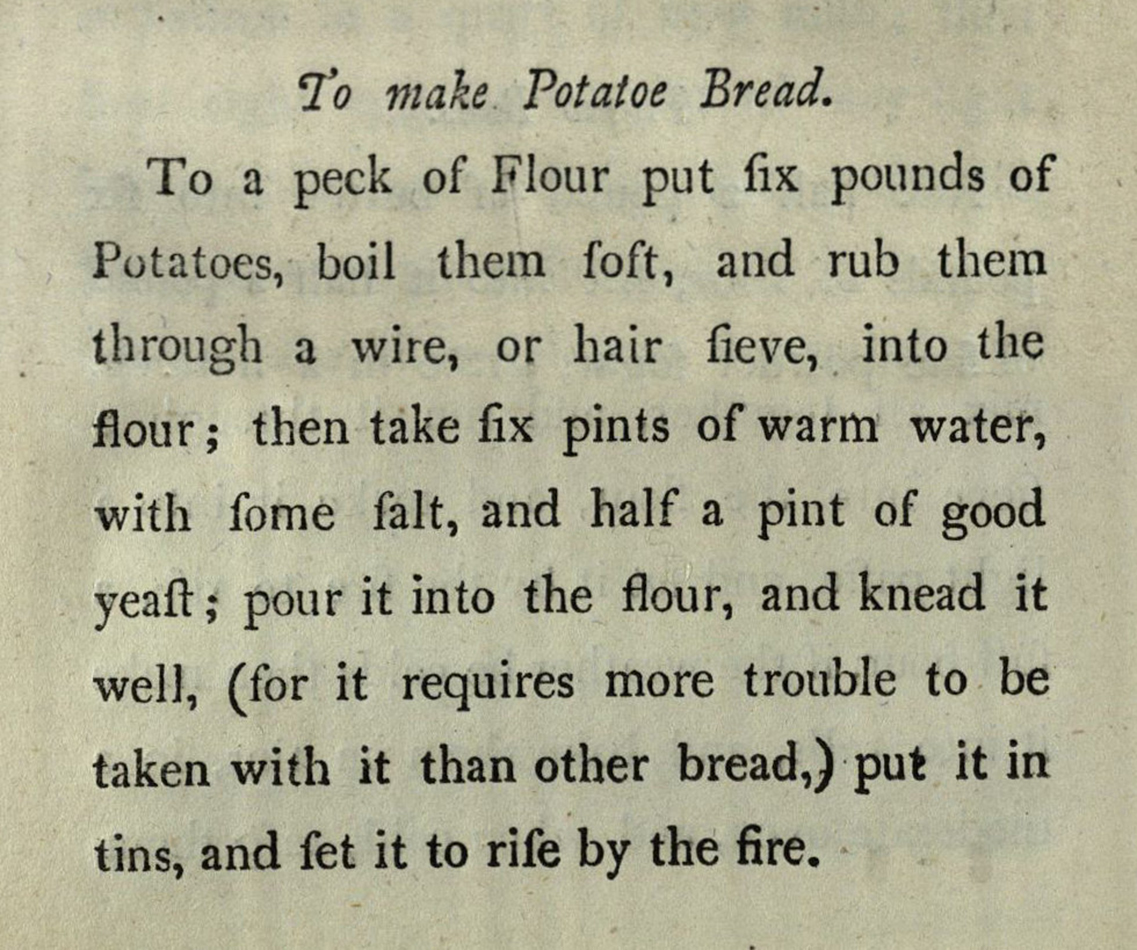
The Family Director’s recipe for “Potatoe bread” calls for a peck of flour (2 imperial gallons, or 32 cups), so I reduced the recipe to about one-eighth, or 4 cups of flour to 12 oz. of potato, 1.5 cups of water, and 2 Tablespoons of yeast, with a heaping teaspoon of salt.
Although the potatoes were cooked enough to break easily into chunks, the process of putting them through a sieve was extremely labour-intensive and time-consuming and the frequent mashing and stiring caused the starch in the potatoes to turn into glue. The quantity of water was far too much for that amount of flour, and I ended up kneading in at least 3 more cups of flour to bring the dough to a workable consistency. I divided the dough (now almost double its original quantity) into two loaf pans and set them out of the way to rise.
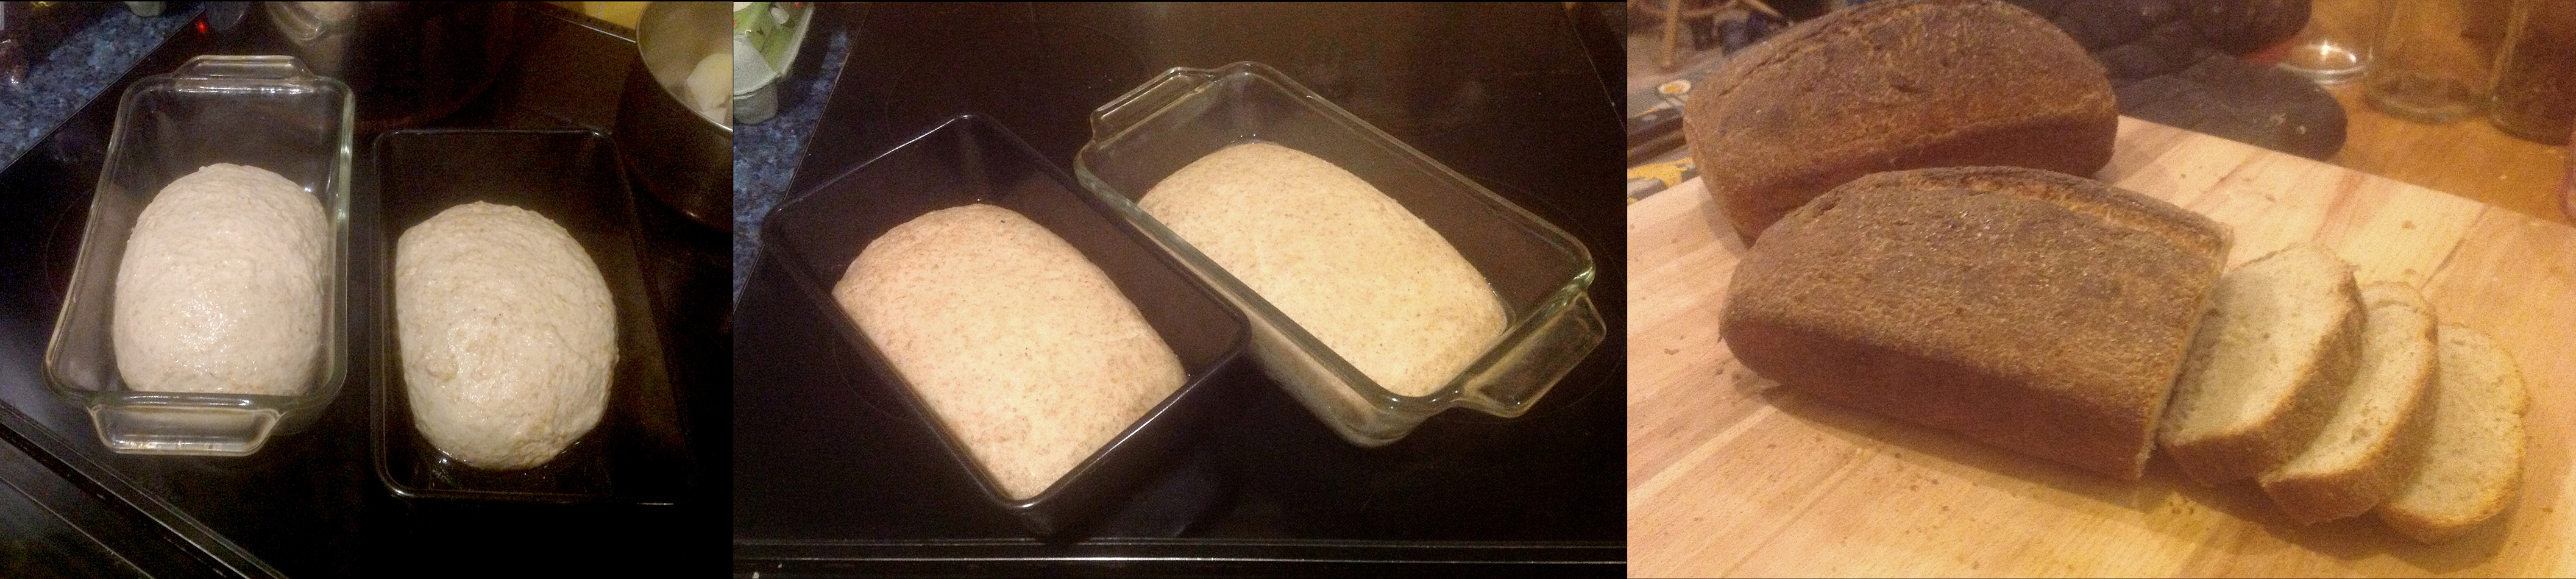
Two hours later, the dough had increased but not quite doubled in bulk. As it was a weeknight and getting quite late, I put the bread in to bake anyway and was rewarded with dense, tough loaves that tasted nice but gave the jaws quite a workout.
The following day, I started the ginger beer. There is no recipe for ginger beer in The Family Director, but our 19th century recipe books and manuscript collections are positively littered with them. Many ginger beer recipes require 2-4 weeks of fermentation, and another 2-4 weeks in bottles before the ginger beer can be drunk, but in a manuscript recipe book dating from around the same time as The Family Director, I found a recipe for “ginger water” which requires only four days of fermentation and another three in bottles before it is ready to drink. The recipe book belonged to a Mrs Greig, who lived at Myres Castle at Auchtermuchty, about 19 miles West of St Andrews.

“Boil ten gallons of water and let it stand till lukewarm, then add nine pounds of lump sugar, three quarters of a pound of good ginger bruised, & three gills of yeast. having put all into the barrel, let it ferment sixteen hours, which is quite long enough if the yeast be good. give it half an ounce of isinglass dissolved, and bung it up, in four days it is ready to be bottled, and after three days in the bottle, if the weather bee warm, it is generally ripe for drinking. it keeps better in stone than in glass bottles.”
From MS 37012, Recipe Book.
The recipe is very simple, the only unusual ingredient being isinglass, which is available from most home brew shops. Made from the swim bladders of fish, isinglass is used to clarify wines and beers, causing the yeast to settle out more quickly than it would otherwise.
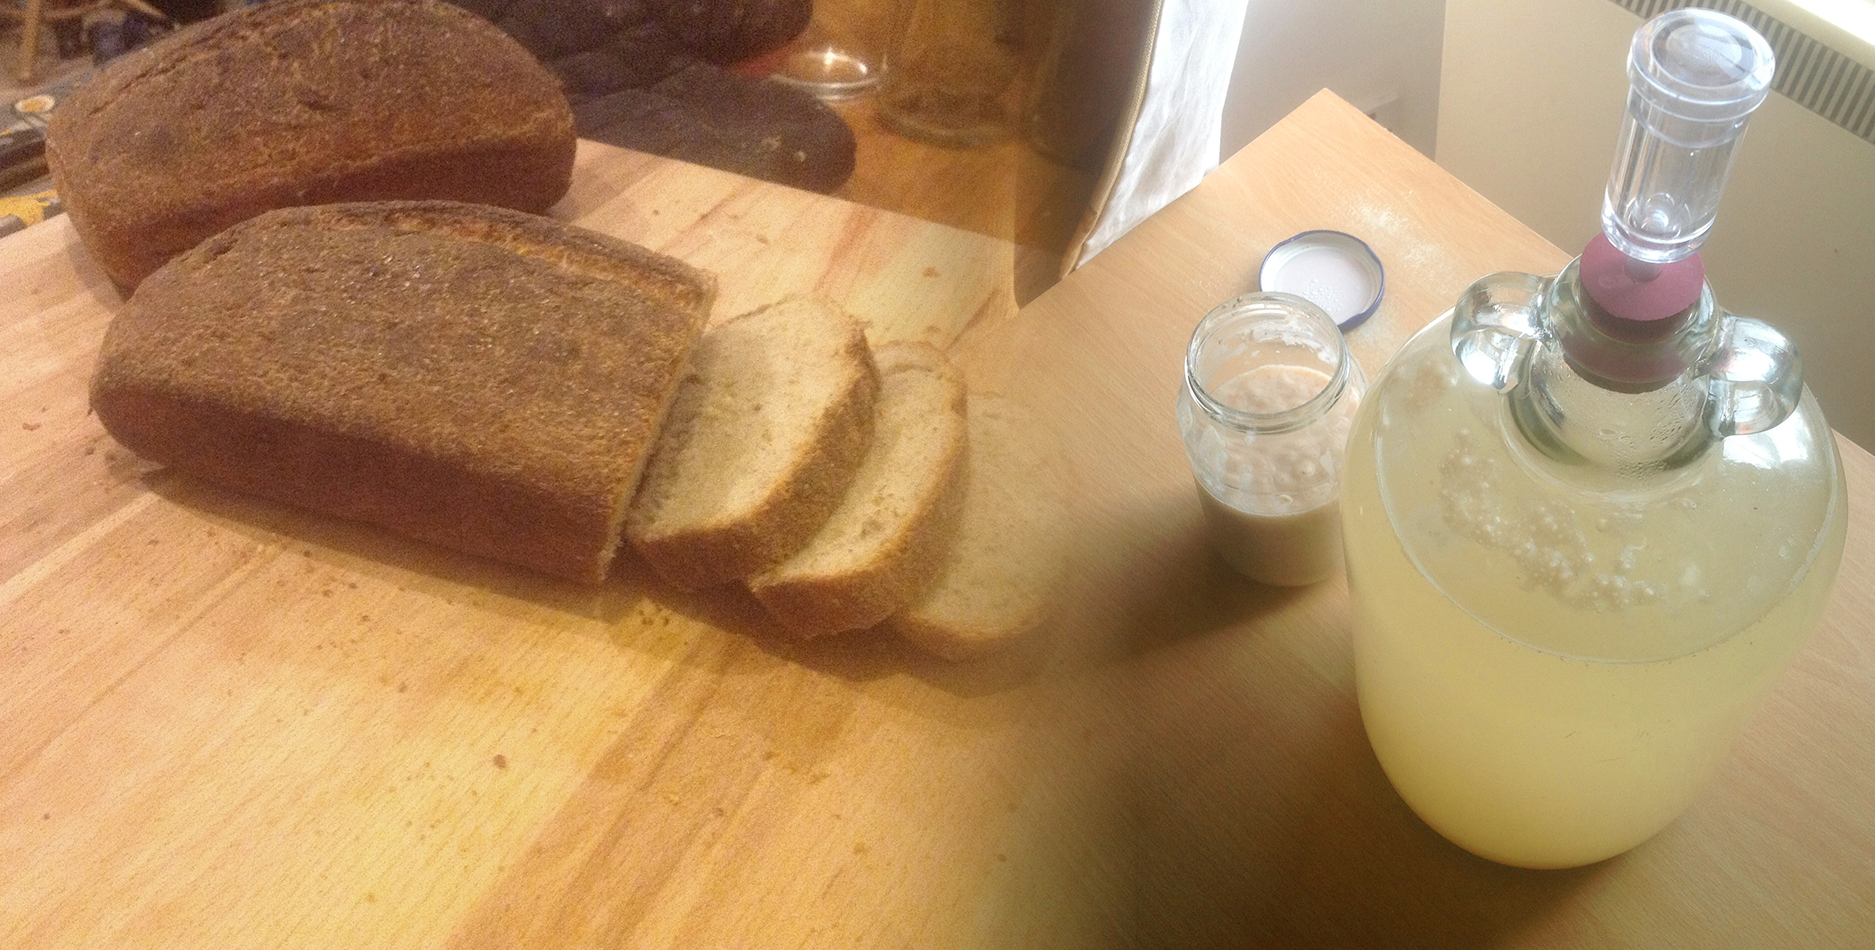
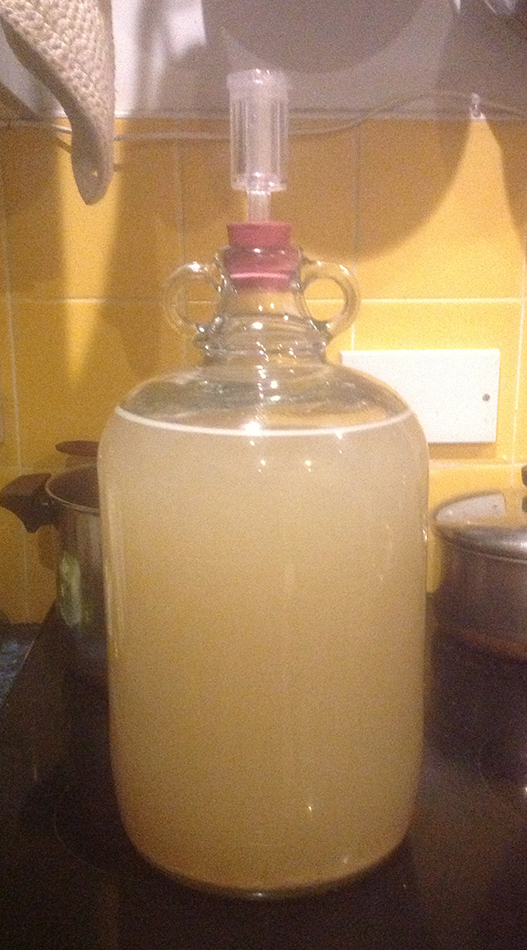
Here again, I reduced the recipe to one tenth its original volume, boiling 14.4 oz sugar and 1.2 oz ginger (a piece a little bigger than my thumb, cut into chunks) in one gallon of water. Once the liquid cooled to lukewarm, I added a little less than 3 Tablespoons of yeast, which made the liquid quite cloudy. Not having a barrel in which to ferment it, I left the liquid in the pot with the lid on until the following evening, added the amount of isinglass recommended on the packaging, and then transferred it to a demijohn with a fermentation lock and stopper, removing the chunks of ginger root. Although the syrup did not appear to be bubbling in the pot, I noticed bubbles coming out of the airlock almost as soon as the bottle was stoppered, a good sign that the yeast was hard at work.
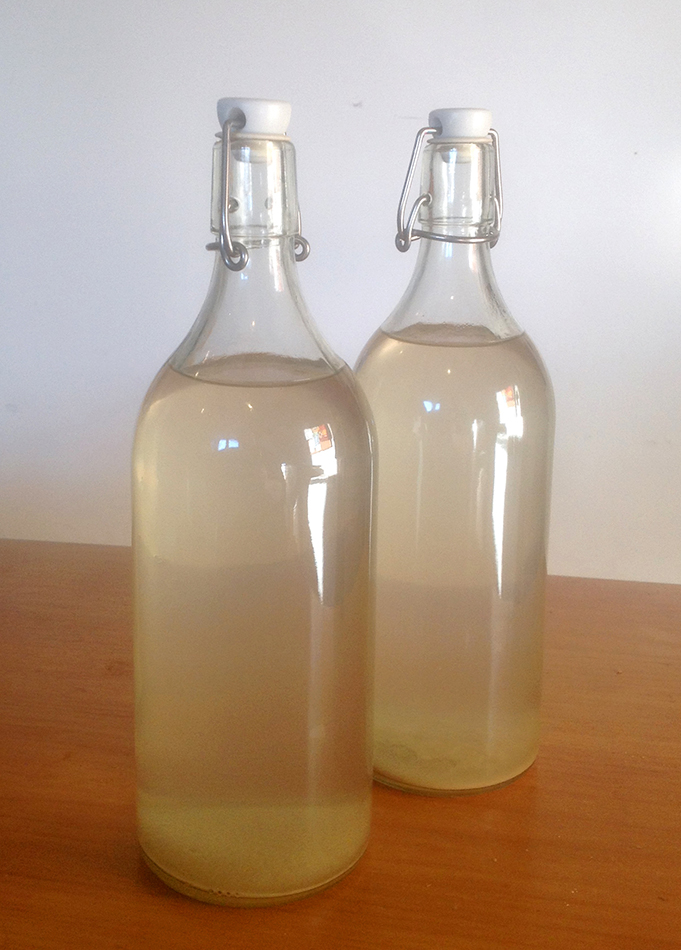
After four days in the demijohn, the liquid was still a bit cloudy, but much of the yeast had settled at the bottom of the container. I siphoned the ginger water into bottles and after two days in a moderately warm kitchen, the bottle containing most yeast sediment (i.e. the last one filled) was pleasantly fizzy. The other bottles, containing less yeast sediment, took four days to become fizzy. I could neither taste nor feel any effects from alcohol produced during fermentation, so the amount of alcohol is probably quite low. In all cases, the flavor was very pleasant: not too sweet, and not too hot.
I know from previous experience that yeast will continue converting sugars into carbon dioxide and alcohol after bottling. Over time, the soda will become less sweet, more alcoholic, and more pressurised inside of the bottle. If left long enough, the bottle can burst, so it’s best to keep your ginger beer someplace cool to slow down fermentation, and drink it within a few days.

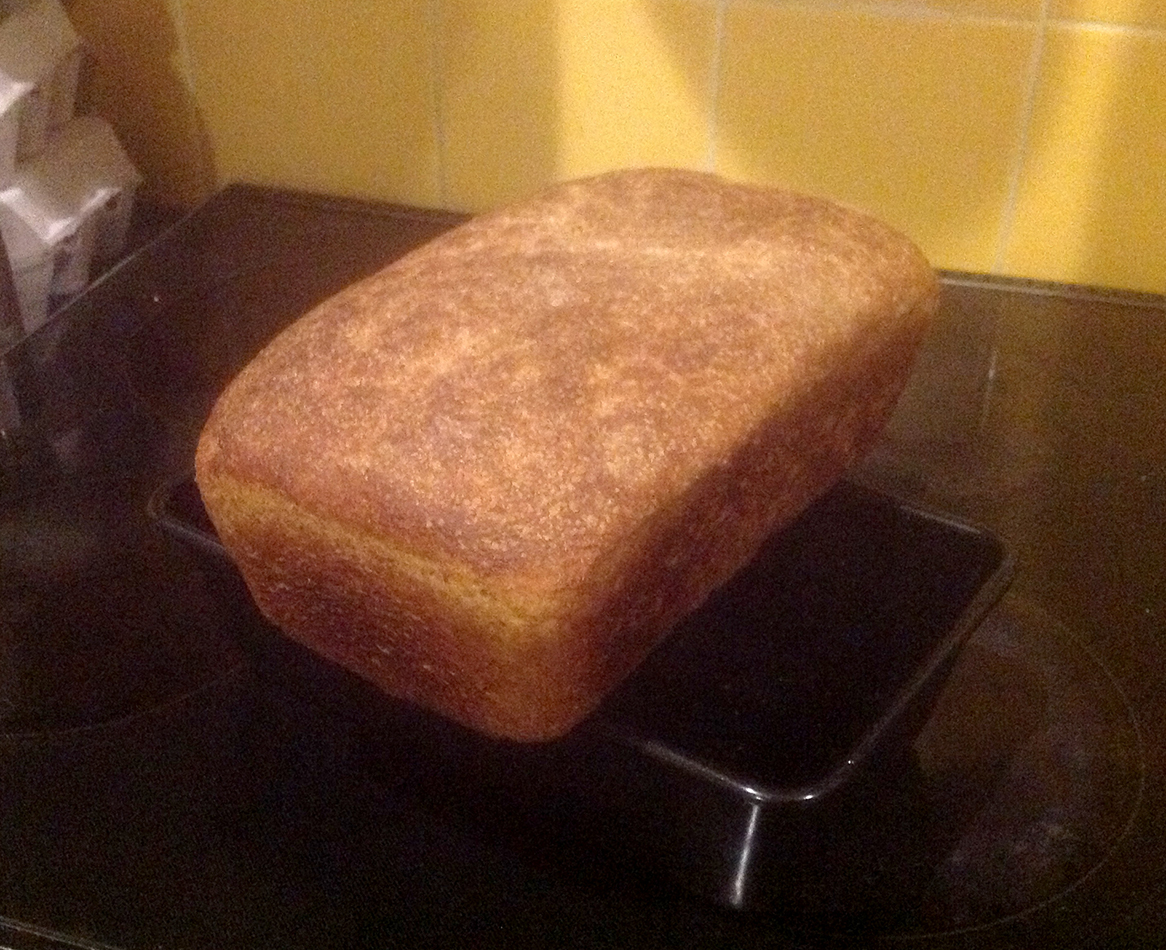
Epilogue: Even after reducing the yeast recipe to one tenth its original size, I still had about half of a jar of yeast left after making the bread and ginger beer. Disheartened but not deterred by my experience with the potato bread, I decided to try another “Houshold bread” recipe from The Family Director. Scaled down to one-eighth quantities, this recipe calls for 4 cups of flour, 1 3/4 cups of water, 1/4 Tablespoon of salt, and 2 Tablespoons of yeast. This time, I mixed together the dry ingredients and the yeast first, adding the water little by little until the dough was springy but not too sticky. In the end, I only needed 1 1/4 cups of water. Once the dough was kneaded and shaped into loaves, I warmed my oven on its lowest setting for a minute or two and placed the loaf tins in the warm oven to rise, turning the oven on for just a minute or so every hour. If I allowed the oven to get cold, the bread stopped rising, which I suspect was my problem with the potato bread. After the dough had doubled in bulk, I took it out, pre-heated the oven to 180° C/375° F, and baked it for about 30 minutes. The bread was still more dense than a supermarket loaf, but not enough to invite comparisons with bricks. It was enough of a success that I plan to continue feeding my yeast and trying out other sourdough recipes in the coming weeks.
-CM
I found your bread making experiences fun. Congrats on your perseverance. As a child during the 1939 -45 War Isingglass was used by my family to preserve eggs.
Nicely told tusitalla